Leaf Press Kit

Introducing our new Leaf Pressing Kit. The kit consists of a beautifully designed and crafted cherry and maple hand press, 50 sheets of blotting paper, 12 acrylic display frames and a self addressed stamped envelope.
A Little Background from Tyler
My 7-year old daughter, Olivia, and I caught the "leaf identifying bug" in the fall of 2012. While out on walks we would pick a couple leaves off a tree and place them in a book, then hopefully identify them at home with a few tree identification field guides that I've bought over the years. During that autumn, she and I collected hundreds of leaves and we stuffed them in my old woodworking catalogs. A few months later, while searching for an indoor activity, we simply glued the leaves onto cut-up construction paper and added some identification notes. We slid the mounted leaves in some 4" x 6" acrylic frames that we had around the house and stuck them on the fridge for display. She and I were very happy with our creations!
We resumed collecting leaves in the Spring of 2013 and I discovered that my collecting technique was flawed because the Spring leaves contain more moisture than the dry, Autumn leaves. Pressing the wet, Spring leaves between the pages of books was not allowing them to dry and flatten properly, plus the moisture was ruining the pages. We needed a designated leaf press.
The Press
Our leaf press is made of the finest American hardwoods available and is designed to last a lifetime. The sides are made of cherry; the dowel, screw and knob portions are made of maple. Plus, we use contrasting walnut plugs to hide our screws. It measures 8 1/2" tall and 9 3/4" wide and is finished with Danish oil. The press includes 50 sheets of 5" x 8" acid-free, absorbent blotting paper.

The Frames
Twelve acrylic (plexiglass) frames are included in the kit. There is a piece of magnetic tape adhered on the back of the frames. We include six 3 1/2" x 5" frames and six 4" x 6" frames with basic gray "chipboard" inside. If you wish, you may substitute the chipboard with construction paper, mat board or card stock. Also, Tyler and Olivia include one of their favorite leaves in a frame.
The Self Addressed Stamped Envelope
Will you please send us one of your favorite leaves framed?
How to Collect, Press and Mount Leaves according to Tyler and Olivia

When Olivia and I go out specifically to collect leaves, we bring the press and blotting paper. We carefully choose 2 or 3 perfect leaves from a given tree, place them between the blotting paper sheets then clamp them in the press. If we don't have the press with us, we will place leaves between the pages of a magazine. We then transfer the leaves to the press as soon as possible.
We empty the press after one week. But, we typically don't mount the leaves at this point. We store our leaves between the pages of large, hard-covered books. Don't worry because at this stage the dried, flattened leaves will not damage your books.
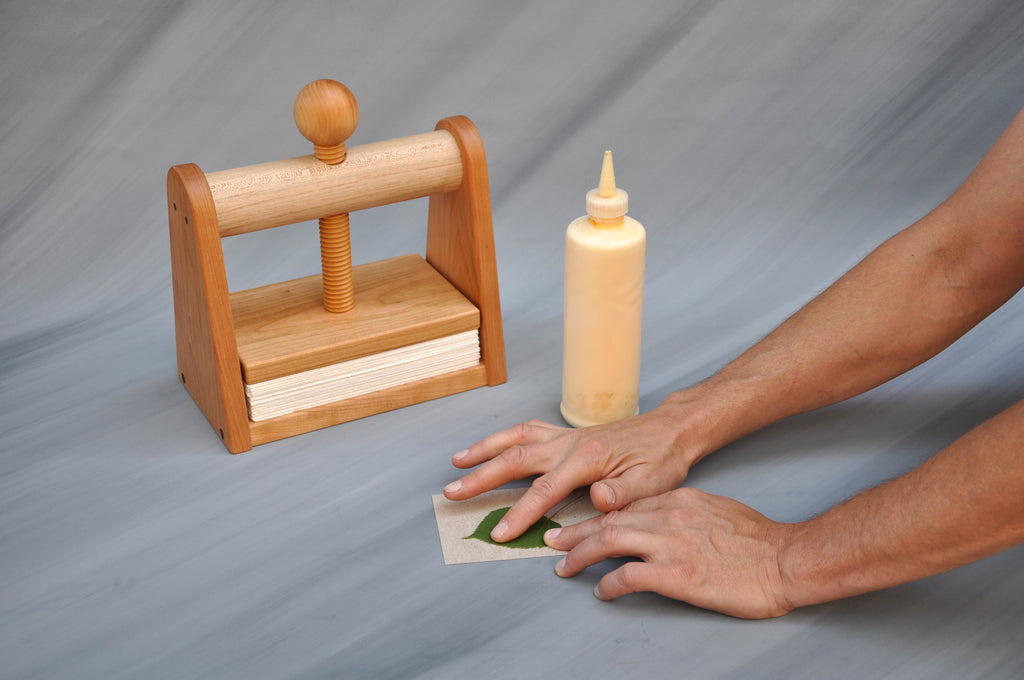
When we're ready, we mount the leaves. This step requires a bottle of white (Elmer's) or yellow glue. The trick is to place enough glue on the leaf while preventing the glue from squeezing out on your paper. This is best achieved by placing small drops of glue on the back side of the leaf, then flipping it onto your paper. Lastly, use your fingers to clamp and smooth out your leaf.
We then like to write a note or two on the front or the back of the paper. These notes may include the common name, scientific name, shape description, date, location, or something personal; like, "my first Shantung Maple leaf found in Fort Collins!"
We then place the mounted leaf in an acrylic frame and stick it on the fridge or any metal surface. Also, Olivia frequently opts to turn her mounted leaves into birthday or friendship cards.
Feel free to contact me if you have any questions because I love talking leaves (and baseball.) You may also contact Olivia. She too loves talking leaves (and One Direction.)